Sample
Overview
The Asmodee.net Unity SDK comes with a sample showing the full extent of the possibilities of the Asmodee.net Scalable Server.
This SDK provides an architecture which decouples the view from the logic.
View
The view contains only the visual elements of the game. A Unity scene contains a view. The view references all interactive elements present on the screen.
The dice is a visual prefab. Clicking the dice fire an event to the view. The view will then tell the logic that the dice has been clicked.
The view communicates directly with the instance of the logic, then it is notified of the action by a .Net events.
Logic
The logic manages the business of the game. In the sample, it’s the logic that determines the status of a clicked dice. Indeed, the dice can be selected / deselected in certain conditions (round #2 of the player).
The logic will then notify the view that a dice has been selected. Selecting a dice whether for the local player, the AI or a remote player is unified.
Domain (game)
The domain contains all the business entities of the game. The dice’s class is part of the domain. In a game with cards, instances of the cards would be part of the domain.
GameState, Events and Messages are part of the domain too. The domain is transverse to the view and logic.
Domain (Scalable Server)
Scalable Server domain contains the objects returned by the server. This may be the entity Player or the result of a query in Scalable Server.
Documentation of the entire domain is located here:
Diagram
Starting the sample
Setup
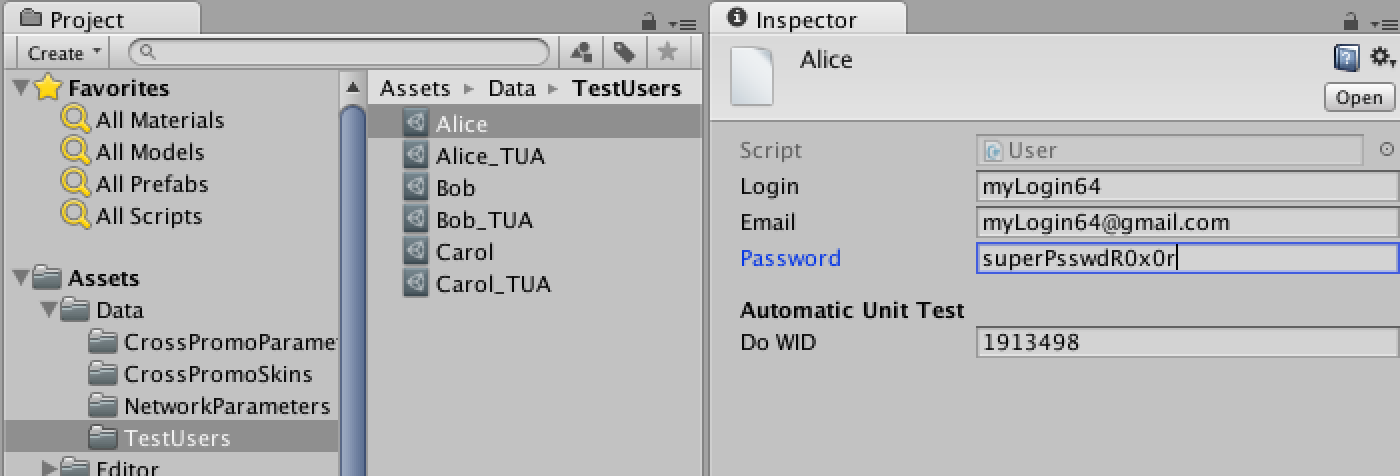
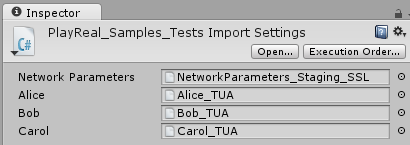
First of all, it’s very important that you override the default credentials of the sample to use you own credentials. Failing to do so will most likely lead to deconnections and errors, as the Scalable Server won’t allow the same player to be logged in more than once at a time.
So, in the Unity Editor, find the user assets in the Project tab: they are located in Assets > Data > TestUsers. They are called Alice, Bob and Carol (Don’t mind the *TUA files, they are for Unit Testing). Replace the Login and Password with yours. As far as testing the Scalable Server Sample goes, these are the only values that need to be changed.
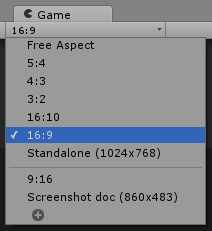
Then in the Game window, set the Screen Ratio to 16:10 or 16:9
Running the sample
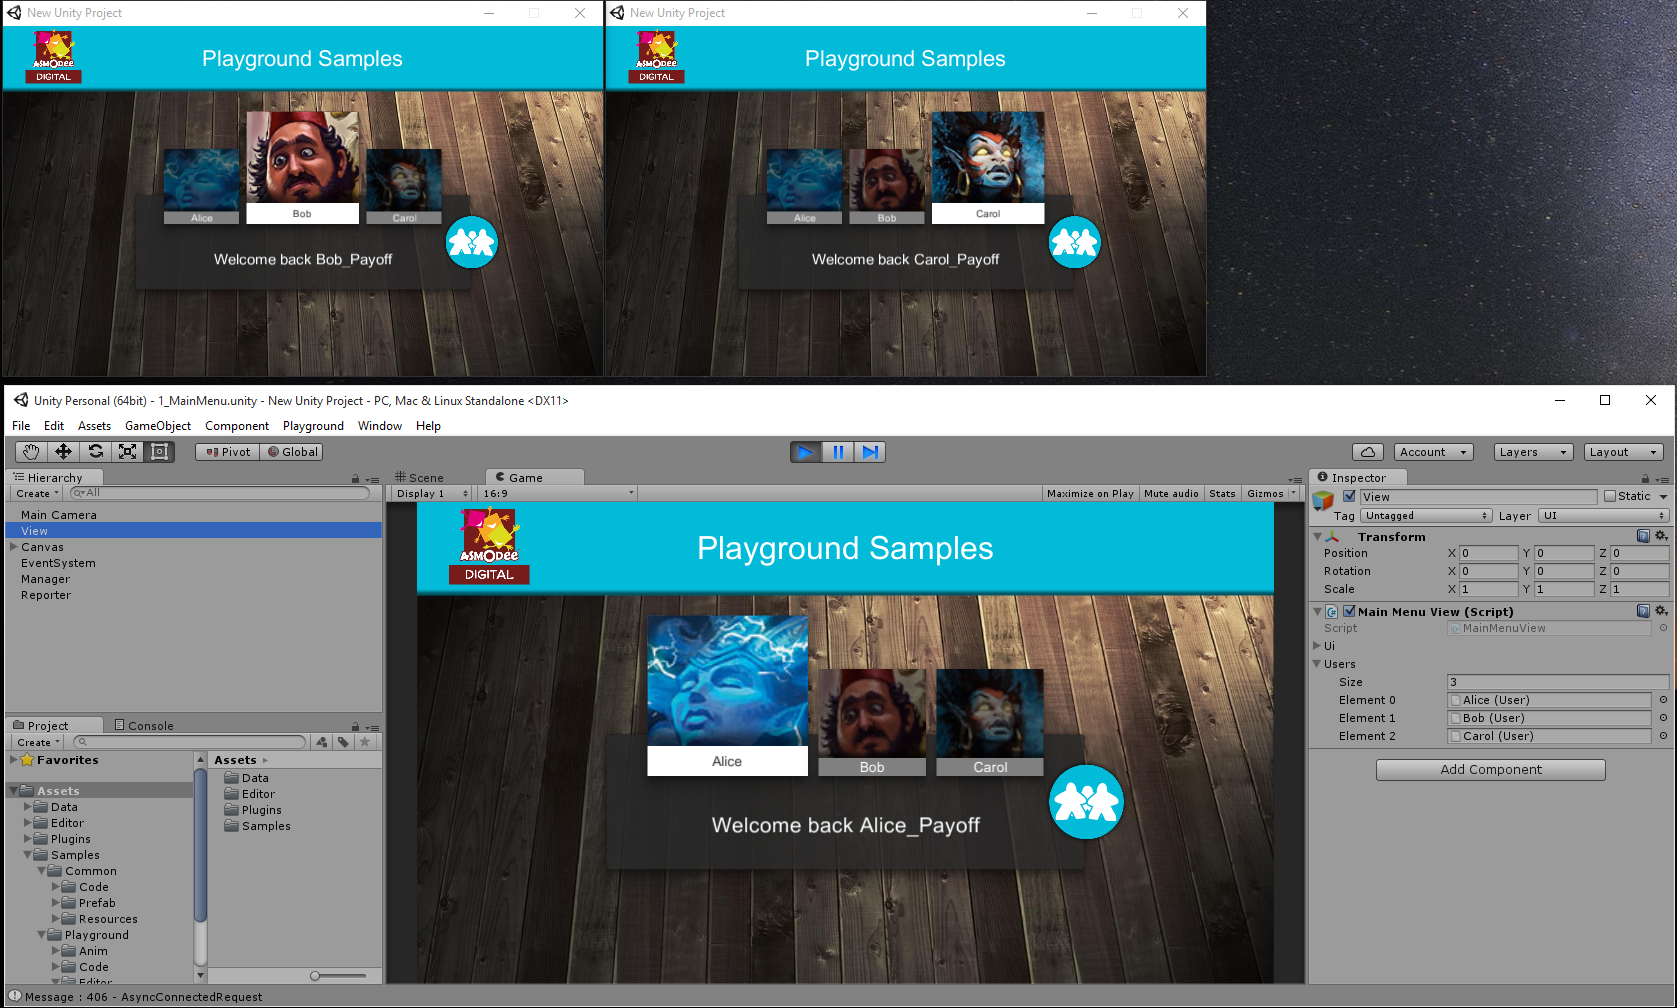
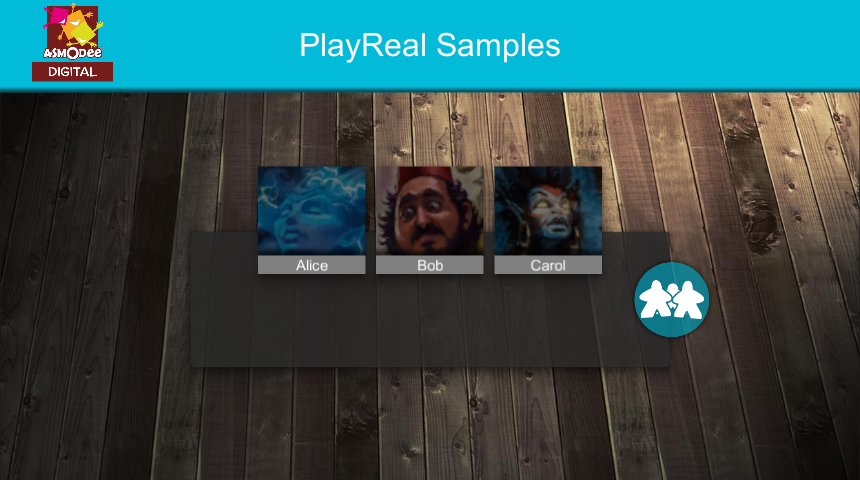
Thanks to the PlayeReal menu, you can build and launch 2 instances of the sample and launch Unity editor at the same time. This is very useful to test multiplayer features.
- The Unity instance will automatically connect with Alice’s account, the scene 1_MainMenu will be open.
- The first window will automatically connect with Bob’s account and will be placed in the upper left corner.
- The second window will automatically connect with Carol’s account and will be placed nearby Bob’s window.
You can resize the Unity window in order to view the 3 instances of the Sample.
Note: automatic placement of the window is only possible on Windows.
Sample build Settings
After importing the package, the 3 scenes of the sample should be added in Build Settings.
For each of the 3 scenes:
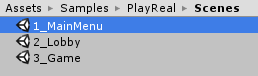
- Open the scene from the directory /Assets/Samples/PlayReal/Scenes/
- Open the File > Build Settings window
- Click the [Add Open Scenes] button
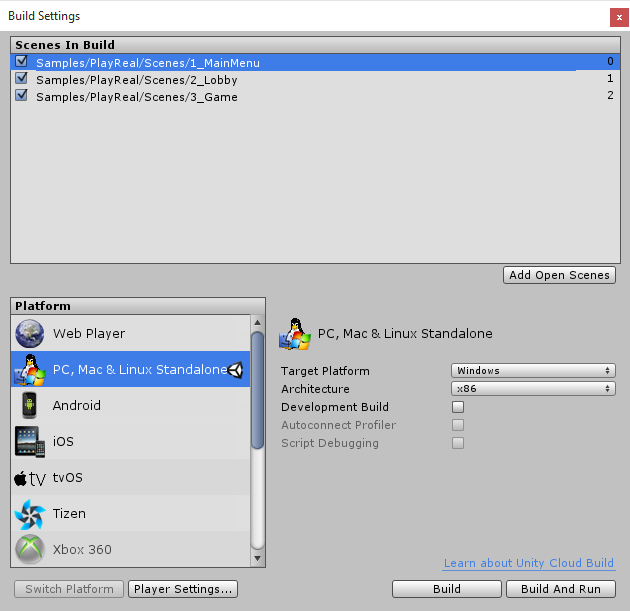
- Close the window and go to the next scene
Account creation
The sample uses 3 Asmodee.net user accounts. To avoid conflicting with other developers using the sample at the same moment, you must provide a login and password for each of these users.
To create Days of Wonder user accounts please go to the Days of Wonder’s website
By convention, we named our 3 users Alice, Bob and Carol (A, B, C)
Management of test accounts in the sample is done through
User data assets stored in the directory /Assets/Data/TestUsers/
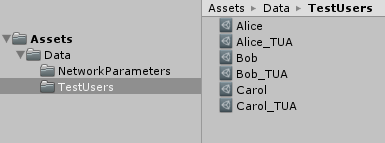
You can now create 3 User data assets in that directory
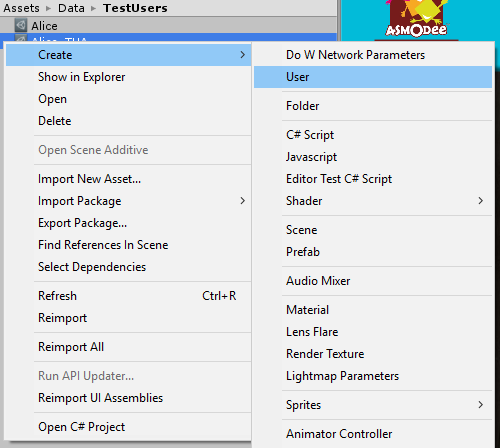
Then simply fill in the fields of the user:

To use these accounts, just open the scene 1_MainMenu
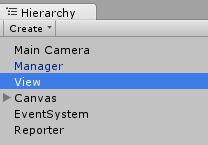
Select View object in the hierarchy
Then drag and drop the data assets created in the Users field instead of Alice, Bob and Carol
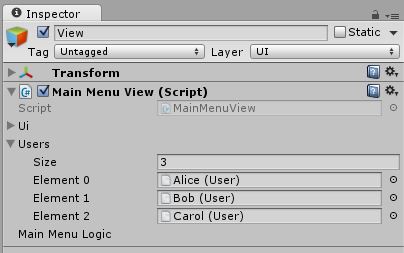
When you start the scene 1_MainMenu, accounts used will be those that you created.
Obviously, this automatic connection system is only useful in the context of local tests and should not be deployed in production.
The User data assets are also used for the unit test.
Just drag’n drop the user in the Alice, Bob and Carol fields of the unit test source code file int the inspector
MainMenuView
The entry point of the sample is the scene 1_MainMenu.
This scene is hosting the MainMenuView that instantiates the MainMenuLogic
that will make the connection with the component ServerConnection.
ServerConnection is the gateway with the Scalable Server.
This scene allows access to the lobby, authentication via the API
REST and different requests of ServerConnection.
Initialization
After MainMenuView is loaded MainMenuView, the first things to do are:
- Instantiate
MainMenuLogic - Subscribe the view to the
MainMenuLogicevents - Initialize
MainMenuLogic
It is the role of the Init() method of MainMenuView
private void Init()
{
    MainMenuLogic = new MainMenuLogic(NetworkManager.Instance.ServerConnection, PersistenceManager.Instance.Persistence);

    MainMenuLogic.ConnectedToServerEvent += MainMenuLogic_ConnectedToServerEvent;
    MainMenuLogic.DisconnectedFromServerEvent += MainMenuLogic_DisconnectedFromServerEvent;
    MainMenuLogic.AuthenticatedEvent += MainMenuLogic_AuthenticatedEvent;

    MainMenuLogic.Init();
    [..]
}
With events, we will be notified when the user is:
- Connected :
MainMenuLogic.ConnectedToServerEvent - Disconnected :
MainMenuLogic.DisconnectedFromServerEvent - Authenticated :
MainMenuLogic.AuthenticatedEvent
Authentication
Connection to the Scalable Server
Prior to authenticating the user, you must connect to Scalable Server.

The MainMenuLogic class, in this case, is a relay for the ServerConnection.Connect method.
When the connection is established, the event MainMenuLogic.ConnectedToServerEvent will be raised. It will then be
possible to authenticate the user.
User authentication on the Scalable Server
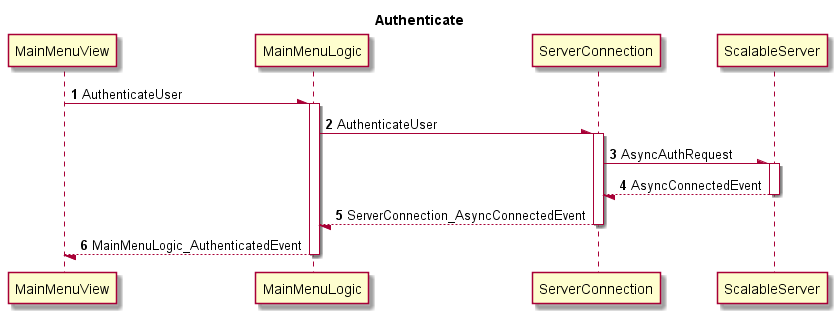
When the application is connected to the Scalable Server we can authenticate the user with his login and password.
To manage push notification for iOS, Android and Steam, the device ID is sent when authenticating.
Once the user is authenticated, the Session and Player objects
are stored in persistence, the event
MainMenuLogic.AuthenticatedEvent is raised. The name and avatar of the
player are displayed.
If there’s reconnection, the session stored in the first authentication is sent.
ServerConnection
Send request
ServerConnection.AuthenticateUser(login, password, gameType, session);
Reception event
ServerConnection.AsyncConnectedEvent += ServerConnection_AsyncConnectedEvent;

private void ServerConnection_AsyncConnectedEvent(AsyncConnectedRequest asyncConnectedRequest)
{
    [..]
}
User logoff
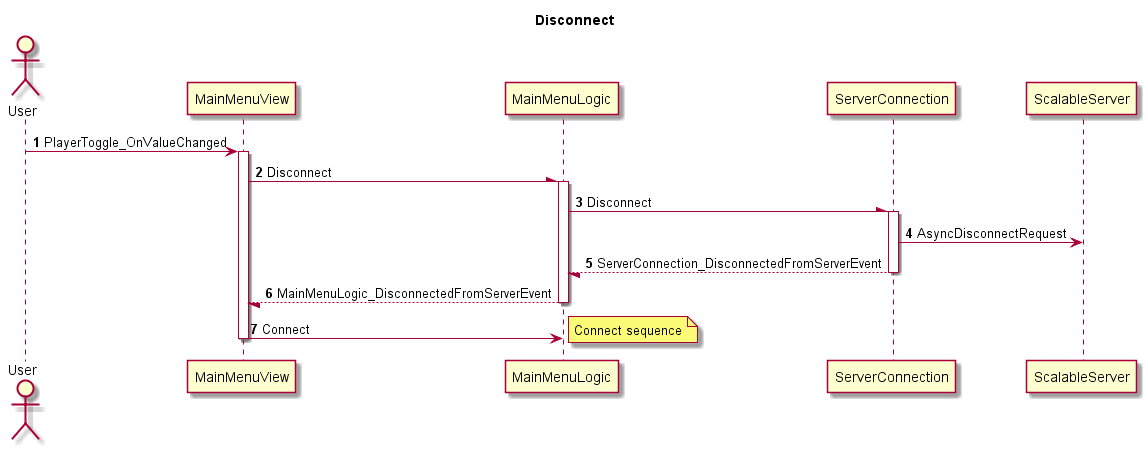
Within the sample, the user is offline when clicking on one of the other two avatars. He will be automatically authenticated on this account.
The disconnect will close the socket between ServerConnection and Scalable Server.
When the user is offline, it is automatically reconnected with the one he selected.
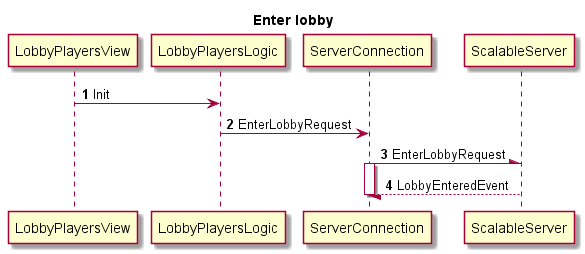
LobbyPlayersView
The lobby is accessible in the scene 2_Lobby by clicking the
button 
The lobby is divided into 2 views and 3 logics.
LobbyPlayersView that displays the chat and the lists of online / friends / ignored players.
This view contains theChatLogicwhich handle chat andLobbyPlayersLogicwhich handle the players lists.
LobbyGameView that displays game creation, opened and ongoing games
This view contains theLobbyGameLogicwhich handle all these features thanks to the ServerConnection.
Initialization
private void Init()
{
    //---> Logics instanciations
    ChatLogic = new ChatLogic(NetworkManager.Instance.ServerConnection, PersistenceManager.Instance.Persistence);
    LobbyPlayersLogic = new LobbyPlayersLogic(NetworkManager.Instance.ServerConnection, PersistenceManager.Instance.Persistence);

    //---> Events subscriptions
    ChatLogic.ClientChatEvent += ChatLogic_ClientChatEvent;
    LobbyPlayersLogic.RefreshLobbyPlayerListEvent += LobbyLogic_RefreshLobbyPlayerListEvent;

    //---> Logics initialization
    LobbyPlayersLogic.Init();
    ChatLogic.Init();
}
Thanks to events, the view will be notified when:
- A chat message is coming :
ChatLogic.ClientChatEvent - The players lists must be refreshed :
LobbyPlayersLogic.RefreshLobbyPlayerListEvent
Access to the lobby
Exiting the lobby
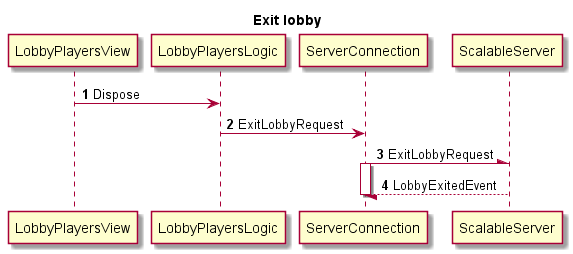
The player exit the lobby when an other view is displayed.
It is triggered by the call of LobbyPlayersView.OnDestroy (automatically by Unity). The LobbyPlayersLogic is then
destroyed, resulting in the call of ServerConnection.ExitLobbyRequest.
Chat
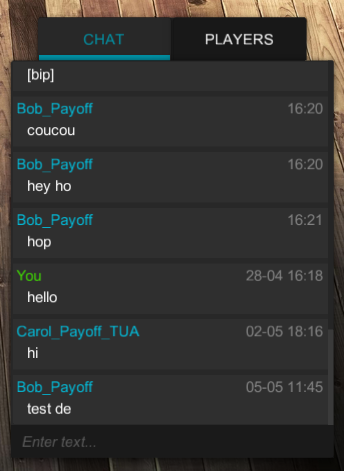
Send a chat message in the lobby
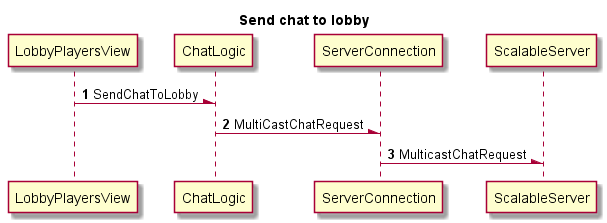
To send a chat message to the lobby, call ChatLogic.SendChatToLobby.
ServerConnection.MultiCastChatRequest is then called without specifying GameID (null).
Receive a message

The message reception is handled by the event
ServerConnection.ClientChatEvent. ChatLogic then notifies
the view that a message has arrived via the event
ChatLogic.ClientChatEvent.
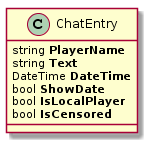
A chat message is encapsulated in a ChatEntry object
containing the name of the sender, the message, the date time, a marker
to determine whether it is the local player or not and a marker for censorship.
Receiving a chat blocked message
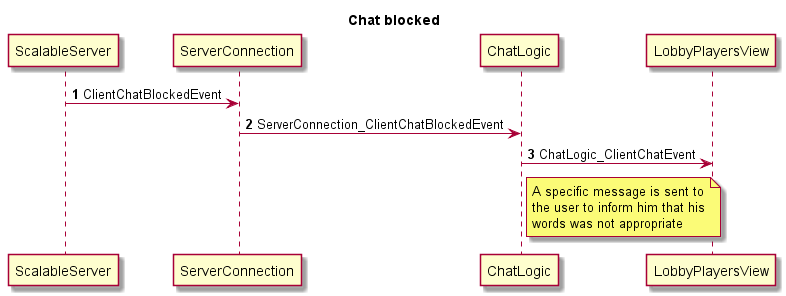
If the message does not pass the anti-profanity filter (handled by
Scalable Server), then the ChatLogic receives the event
ServerConnection.ClientChatBlockedEvent and sends a specific message
to the view through ChatLogic.ClientChatEvent with IsCensored = true
Request / receive chat history in the lobby
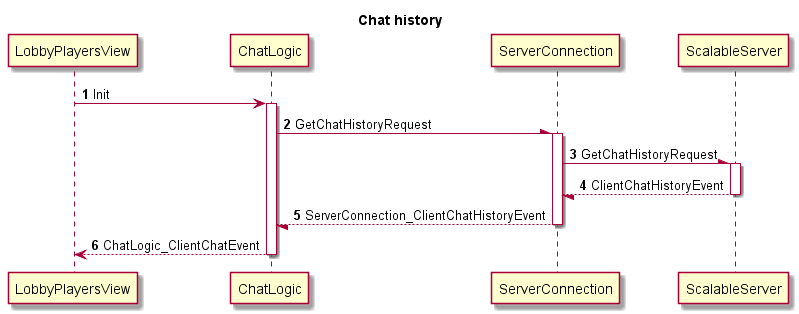
From the display of the lobby, the chat history is downloaded.
ChatLogic then call ServerConnection.GetChatHistoryRequest. GameID parameter is ignored (null)
When the chat history is received, the ServerConnection.ClientChatHistoryEvent is raised.
ChatLogic.ClientChatEvent sent each message unitarily to the view.
Each message is formatted as a new message
Receiving chat history or a new message is unified for the view
Players lists
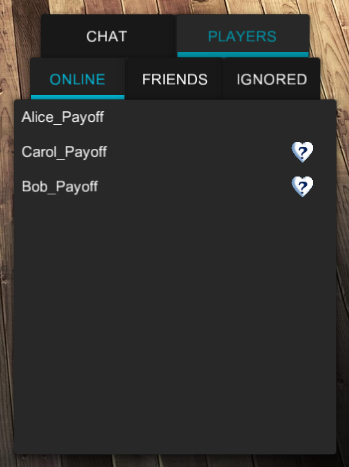
The list of online / friends / ignored players is received automatically after entering the lobby.
Each of these lists is stored in the LobbyPlayersLogic.
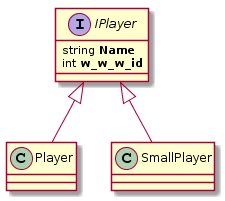
IPlayer interface represents whether an online, friends or ignored player.
Get the list of online players
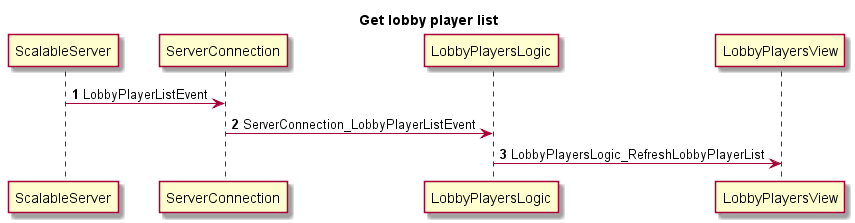
After being registered in the lobby through ServerConnection.EnterLobbyRequest, the online player list is
automatically and regularly sent by the Scalable Server.
To receive it you must subscribe to ServerConnection.LobbyPlayerListEvent
Whenever the online player list is received, it is
stored in memory in LobbyPlayersLogic then the LobbyPlayersLogic.RefreshLobbyPlayerListEvent is called to force
refresh of LobbyPlayersView
Receive the buddy list
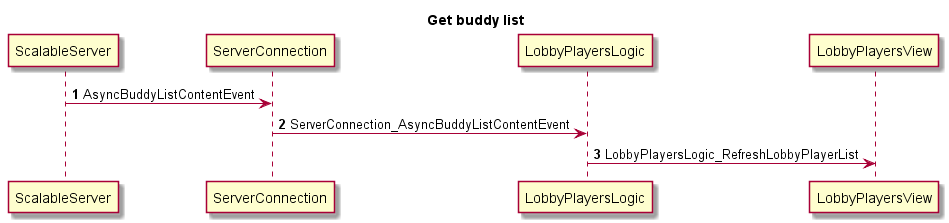
After being registered in the lobby through ServerConnection.EnterLobbyRequest, the buddy list is
automatically and regularly sent by the Scalable Server.
To receive it you must subscribe to ServerConnection.AsyncBuddyListContentEvent
Whenever the buddy list is received, it is
stored in memory in LobbyPlayersLogic then the LobbyPlayersLogic.RefreshLobbyPlayerListEvent is called to force
refresh of LobbyPlayersView
Get the list of ignored players
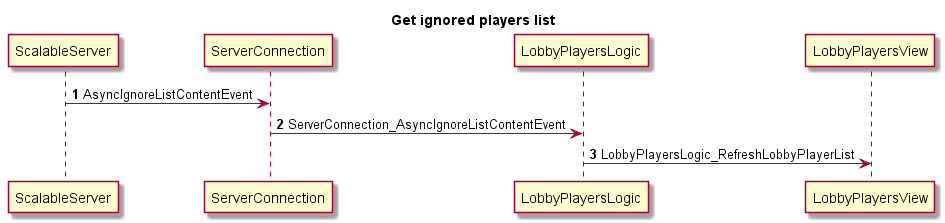
After being registered in the lobby through ServerConnection.EnterLobbyRequest, the ignored player list is
automatically and regularly sent by the Scalable Server.
To receive it you must subscribe to ServerConnection.AsyncIgnoreListContentEvent
Whenever the online player list is received, it is
stored in memory in LobbyPlayersLogic then the LobbyPlayersLogic.RefreshLobbyPlayerListEvent is called to force
refresh of LobbyPlayersView
Add a player to the buddy list
You can add a player to the buddy list by clicking the heart icon next to his name in the list of online players.
A popup is displayed and proposes to add the player to the buddy list by clicking the button [Add to buddy list]
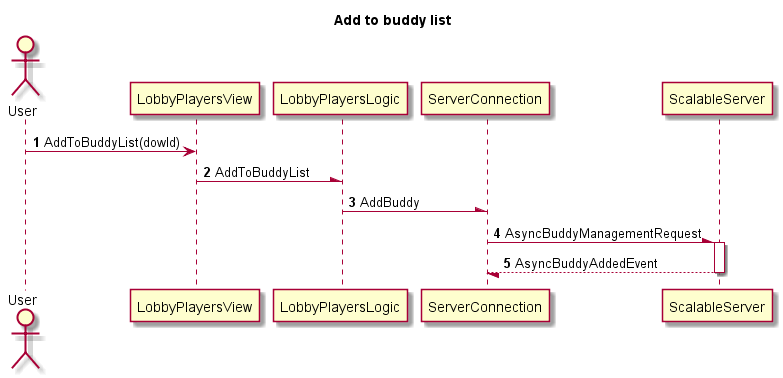
Call ServerConnection.AddBuddy with the Days of Wonder player’s account ID (DoWId, w_w_w_id).
The DoWId is contained in the IPlayer object selected in the list
Remove a player from buddy list
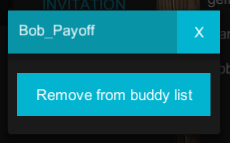
You can remove a friend from the buddy list by clicking the heart icon next to his name in the buddy list.
A popup is displayed and proposes to remove the player from the buddy list by clicking the button [Remove from buddy list]
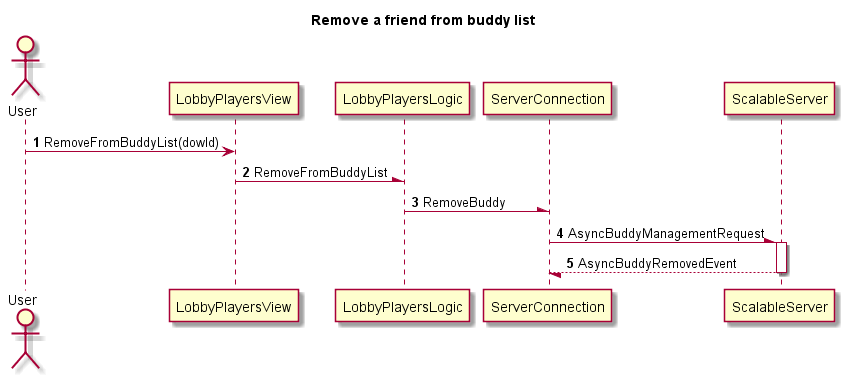
Call ServerConnection.RemoveFromBuddyList with the Days of Wonder player’s account ID (DoWID, w_w_w_id).
The DoWID is contained in the IPlayer object selected in the list
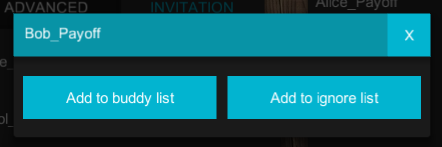
Add a player to the ignored list
You can add a player to the ignored list by clicking the heart icon next to his name in the list of online players.
A popup is displayed and proposes to add the player to the ignored list by clicking the button [Add to ignore list]

Call ServerConnection.AddToIgnoreList with the Days of Wonder player’s account ID (DoWID, w_w_w_id).
The DoWID is contained in the IPlayer object selected in the list
Remove a player from the ignore list
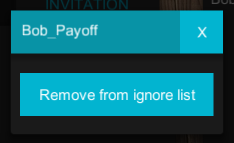
You can remove a player from the ignored list by clicking the heart icon next to his name in the ignored list.
A popup is displayed and proposes to remove the player from the ignored list by clicking the button [Remove from ignore list]
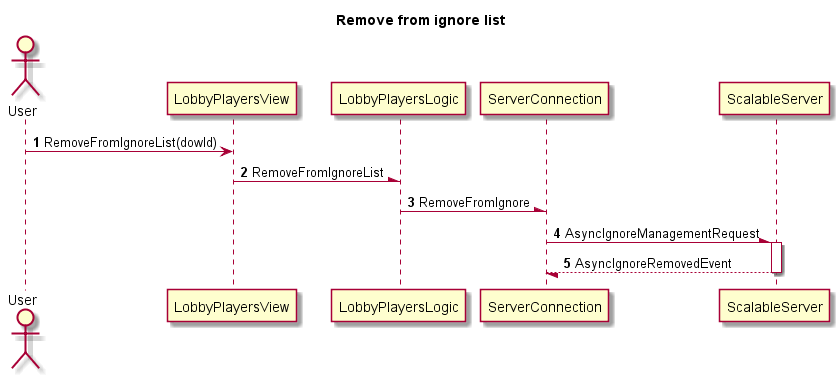
Call ServerConnection.RemoveFromIgnoreList with the Days of Wonder player’s account ID (DoWID, w_w_w_id).
The DoWID is contained in the IPlayer object selected in the list
LobbyGameView
Initialization
/// <summary>
/// Initialize the view - Creating logic - Creating .Net events
/// </summary>
private void Init()
{
LobbyGameLogic = new LobbyGameLogic(NetworkManager.Instance.ServerConnection, PersistenceManager.Instance.Persistence);
LobbyGameLogic.LobbyOpenGameListEvent += LobbyGameLogic_LobbyGameListEvent;
LobbyGameLogic.LobbyResumeGameListEvent += LobbyGameLogic_LobbyResumeGameListEvent;
LobbyGameLogic.InvitationArrivedEvent += LobbyGameLogic_InvitationArrivedEvent;
LobbyGameLogic.InvitationAcceptedEvent += LobbyGameLogic_InvitationAcceptedEvent;
LobbyGameLogic.InvitationRejectedEvent += LobbyGameLogic_InvitationRejectedEvent;
LobbyGameLogic.LobbyNewPlayerEvent += LobbyGameLogic_LobbyNewPlayerEvent;
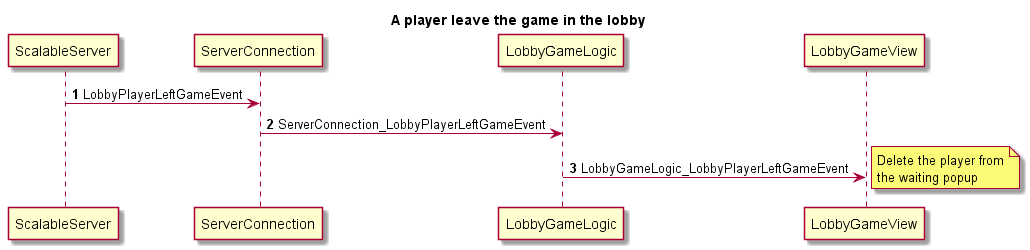
LobbyGameLogic.LobbyPlayerLeftGameEvent += LobbyGameLogic_LobbyPlayerLeftGameEvent;
LobbyGameLogic.LobbyJoinDeniedEvent += LobbyGameLogic_LobbyJoinDeniedEvent;
LobbyGameLogic.Init();
}
Thanks to events, the view will be notified when:
- The list of opened games must be refreshed :
LobbyGameLogic.LobbyOpenGameListEvent - The list of ongoing games must be refreshed :
LobbyPlayersLogic.LobbyResumeGameListEvent - The player is invited to a game :
LobbyGameLogic.InvitationArrivedEvent - The invited player accepted the invitation :
LobbyGameLogic.InvitationAcceptedEvent - The invited player refused the invitation :
LobbyGameLogic.InvitationRejectedEvent - A new player joins the game :
LobbyGameLogic.LobbyNewPlayerEvent - A player leaves the game :
LobbyGameLogic.LobbyPlayerLeftGameEvent - The player is not allowed to join the game
LobbyGameLogic.LobbyJoinDeniedEvent
Creating a game
Creating a solo / pass and play game
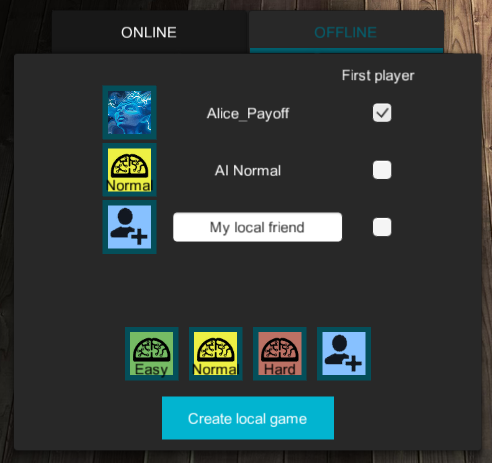
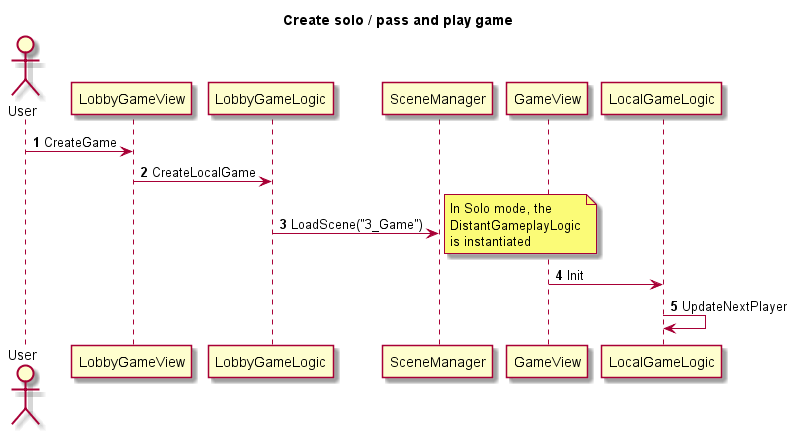
To create a solo / pass and play game, the player must drag’n drop AI or Local Player icons in empty slots. he can name the local players and define who goes first.
LobbyGameLogic.CreateLocalGame method is then called, the
following settings are stored in the persistence:
Persistence.GameType = GameType.LocalPersistence.PlayerSeats.AddRange (playerSeats)
The scene 3_Game is loaded and the game can begin.
ServerConnection is not used in a solo game, as there is no need of related features of the Scalable Server. It is, therefore, possible to create a solo game without authenticating the user.
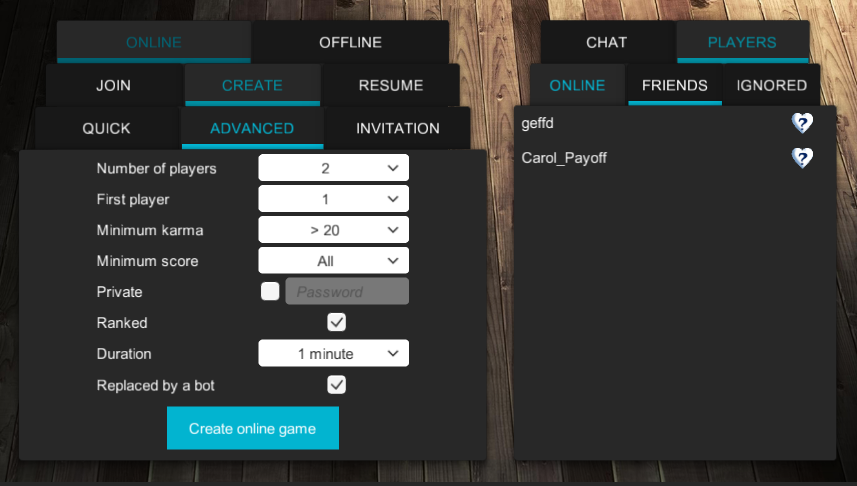
Creating an open online game
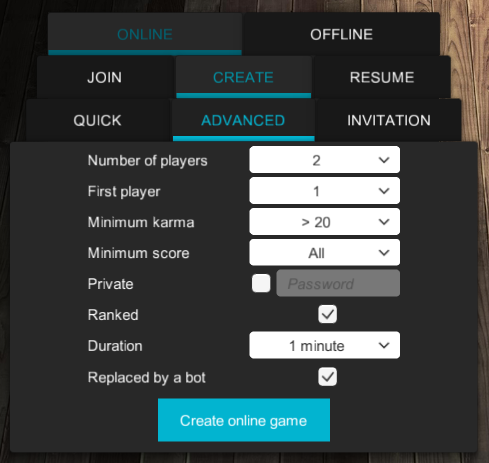

You can create an online game done from the [QUICK] or [ADVANCED] tabs. It is possible to determine many parameters which some values are predefined for Quick games.
LobbyGameLogic.CreateOnlineGame is then called with a GameConfiguration parameter.
When the Scalable Server receives the request it return a GameCreatedRequest
which result in a ServerConnection.GameCreatedEvent on client side.
Inviting friends to join a game
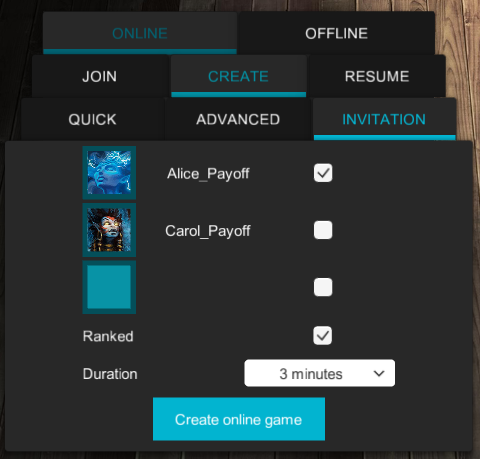
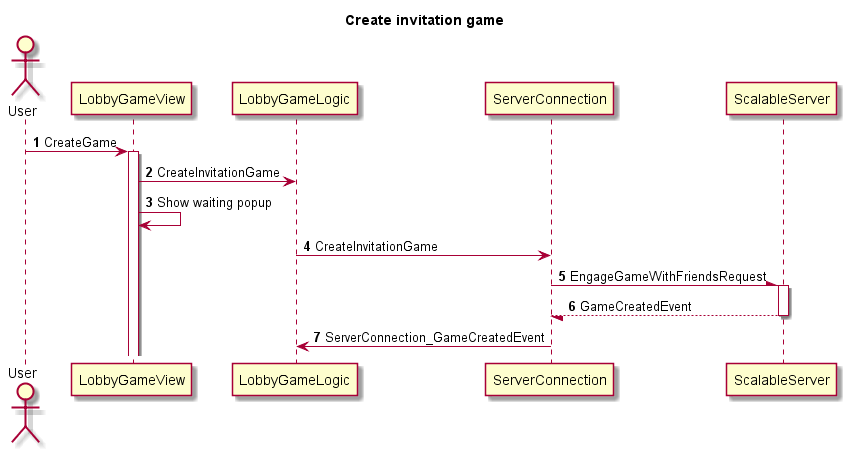
You can invite friends to join a private game. It is necessary beforehand that these players are in the buddy list. Drag’n drop their portrait from the buddy list to a free slot. The [Create online game] button send the request to the Scalable Server.
LobbyGameLogic.CreateOnlineGame is then called with a GameConfiguration parameter.
When the Scalable Server receives the request it returns a GameCreatedRequest to all players involved
which result in a ServerConnection.GameCreatedEvent on client side.
Invitation
Receiving an invitation
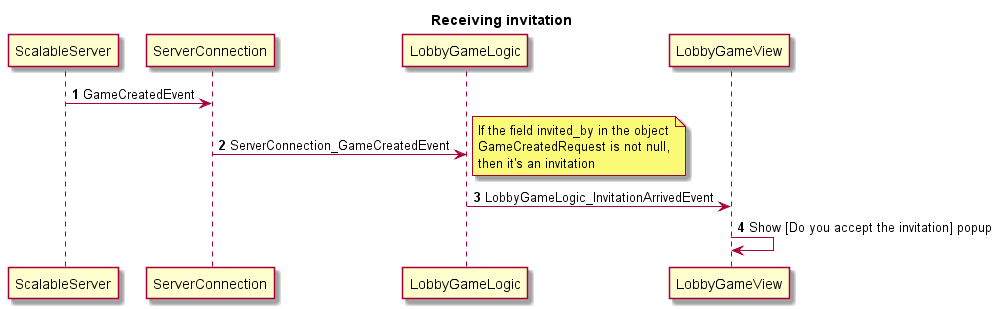
When a player receives an invitation,
ServerConnection.GameCreatedEvent is called. LobbyGameLogic
interprets this event and determines whether it is an invitation. If it’s the case,
LobbyGameLogic.InvitationArrivedEvent is called. The
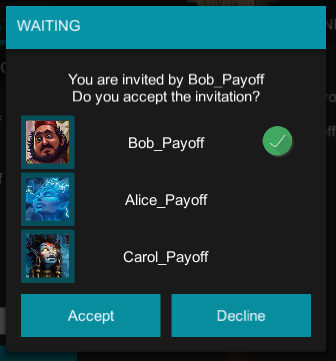
invitation popup appears offering the choice to accept or
decline the invitation.
Accepting an invitation
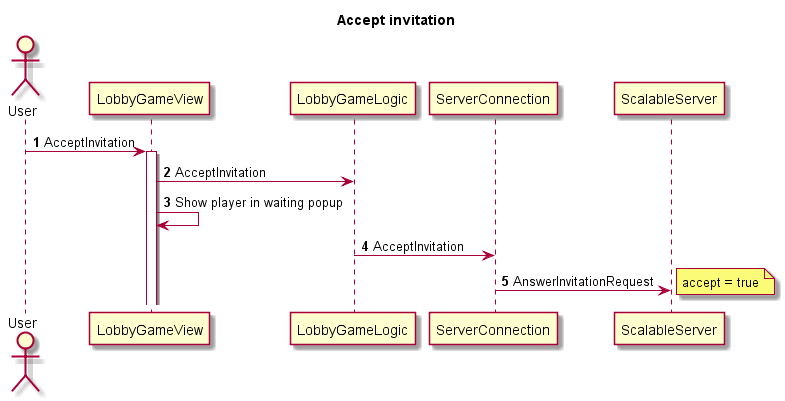
When the player accepts the invitation, LobbyGameLogic.AcceptInvitation
is called with the GameID of the game.
DoWID of the player is stored in the list of players who
accept the invitation. The invitation popup is displayed until all
guests have not responded to the invitation.
The response to the invitation is sent to Scalable Server by sending
AnswerInvitationRequest with the parameter accept = True
Persistence.InvitationAcceptedByPlayers.Add(Persistence.ConnectedPlayer.w_w_w_id);
Declining an invitation
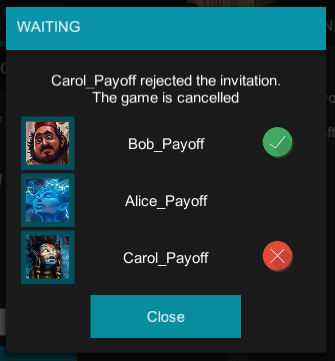
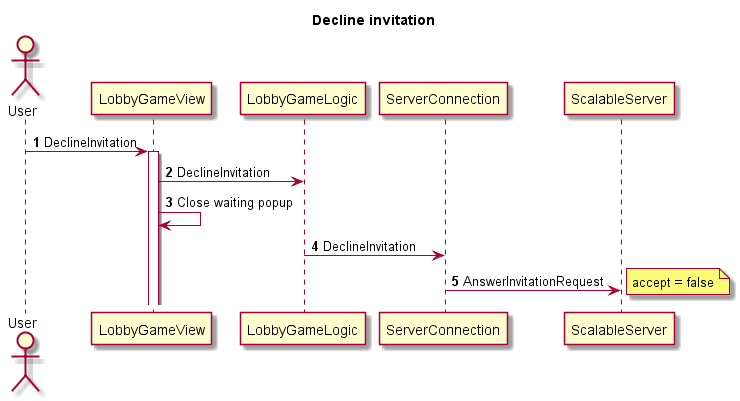
When the player accepts the invitation, LobbyGameLogic.DeclineInvitation
is called with the GameID of the game.
The invitation popup is closed.
The response to the invitation is sent to Scalable Server by sending
AnswerInvitationRequest with the parameter accept = False
Receiving the answer of friend to an invitation
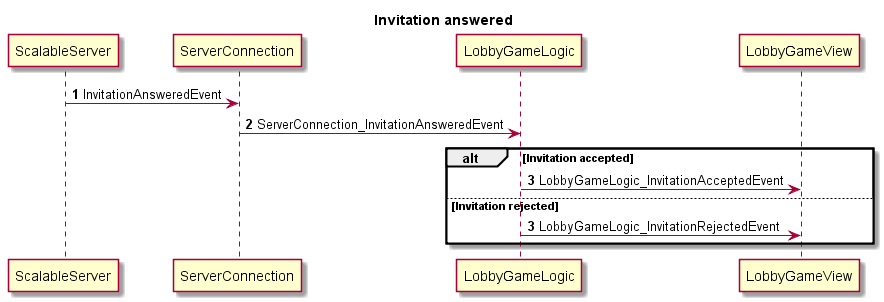
After a friend responded to an invitation,
ServerConnection.InvitationAnsweredEvent is called.
LobbyGameLogic détermines whether the invitation was accepted.
If it’s the case LobbyGameLogic.InvitationAcceptedEvent is called.
If it’s not LobbyGameLogic.InvitationRejectedEvent is called.
The popup is then updated.
Joining a game
Viewing the list of open games
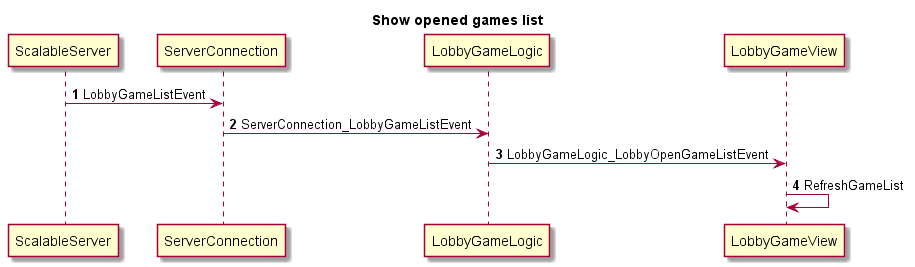
The list of open games is received regularly and automatically after entering the lobby.
Viewing the list of ongoing games
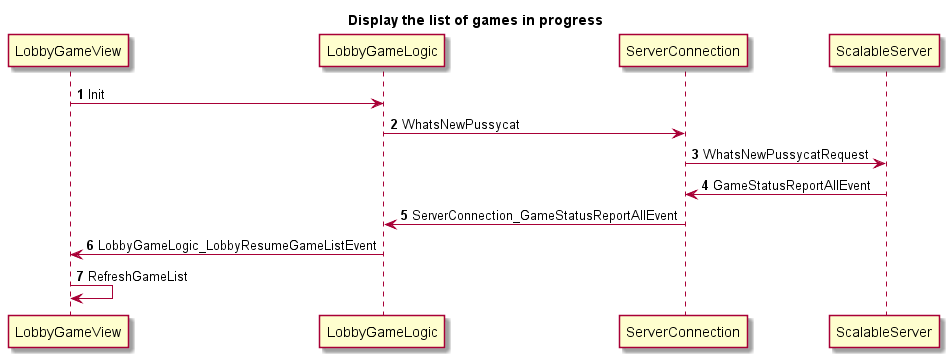
The list of ongoing game is received by calling
ServerConnection.WhatsNewPussycat.
This method is called upon initialization of LobbyGameLogic
Joining an open game
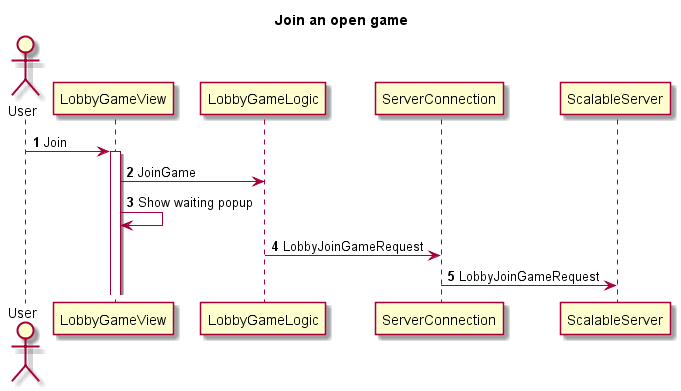
To join a game, LobbyGameLogic.JoinGame is called, it takes one parameter, the
GameDetails
of the selected game to store it in persistence.
Then ServerConnection.LobbyJoinGameRequest is called with the GameID and optional password.
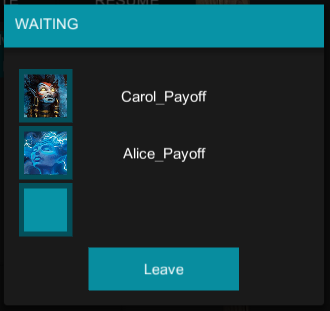
A player joined the open game

When a player joins a game, ServerConnection.LobbyNewPlayerEvent is received
by all players of the game, including the player that just connected. the popup
is updated and displays the portrait of the new player
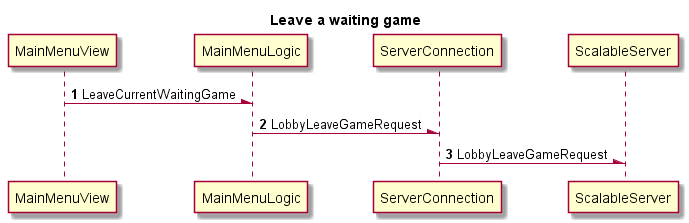
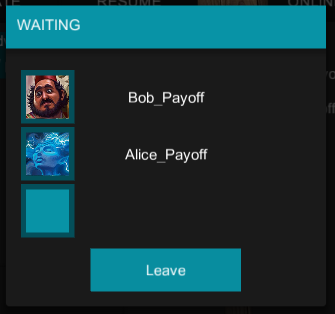
A player leaves the open game
When a player leaves a waiting game, ServerConnection.LobbyPlayerLeftGameEvent
is received by all participating players, including the player who leaves the game.
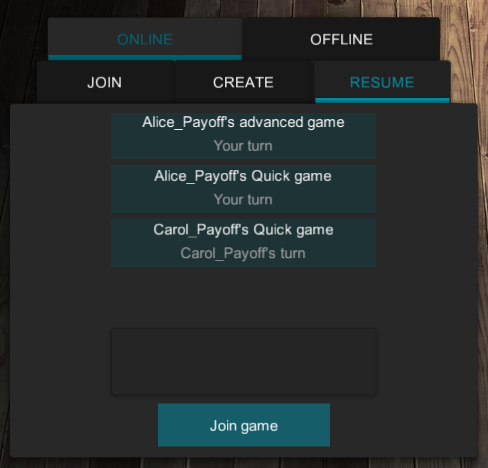
Resuming a game
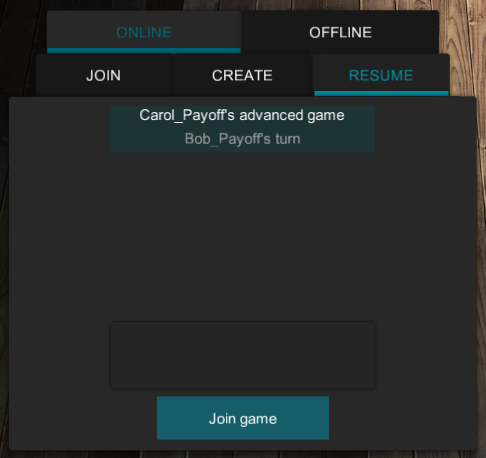
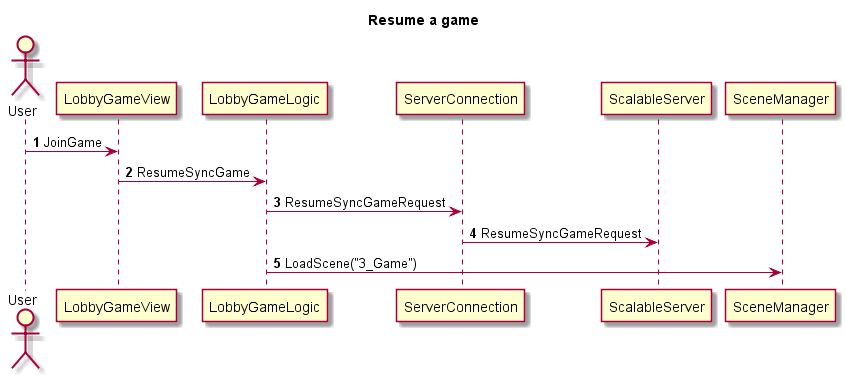
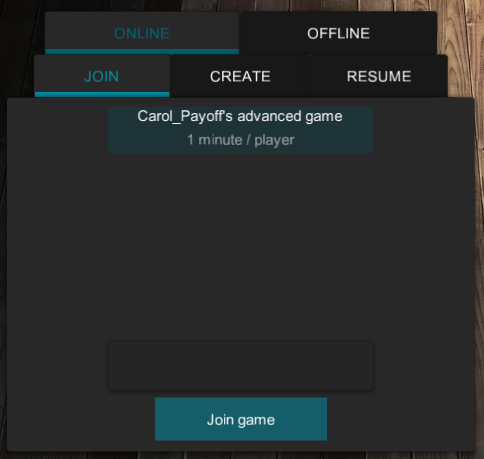
In the [RESUME] tab, the list of games in progress is displayed. A player can resume a game by selecting it and clicking [Join game] button.
LobbyGameLogic.ResumeSyncGame called, the parameter
GameDetails
of the selected game to store it in persistence.
Then ServerConnection.ResumeSyncGameRequest is called with the GameID.
The scene 3_Game is then opened, the player receives all information from the game and can play when it’s his turn.
The player is not allowed to join the game
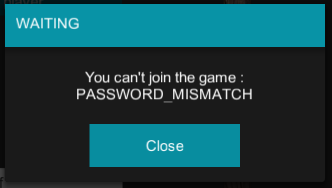
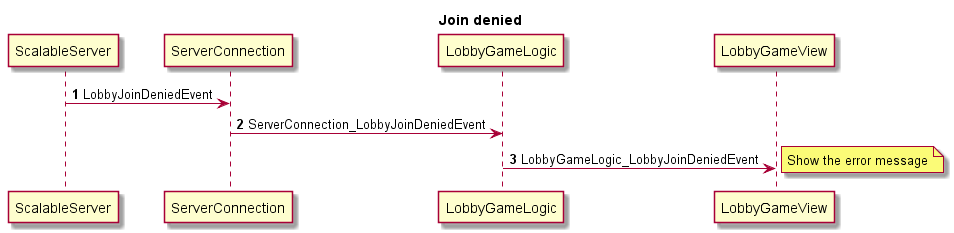
If the player is not allowed to join a game, it receives
ServerConnection.LobbyJoinDeniedEvent.
The errors can be found in the documentation of Scalable Server :
LobbyJoinDeniedRequest.JoinError
GameView

The scene 3_Game hosts the heart of the game. It contains
GameView that instantiate the GameplayLogic and ChatLogic
Initialization
/// <summary>
/// Initialize the view - Creating Local or Distant Logic according to the parameter of the game - Creating .Net events
/// </summary>
private void Init()
{
    //--- Instantiate the GamePlayLogic depending on GameType (Distant, Local or Replay)
    switch (PlayRealManager.Instance.Persistence.GameType)
    {
        case GameType.Local:
            _gameplayLogic = new LocalGameplayLogic(PlayRealManager.Instance.Persistence,  ui.Dices);
            break;
        case GameType.Distant:
            _gameplayLogic = new DistantGameplayLogic(PlayRealManager.Instance.ServerConnection, PlayRealManager.Instance.Persistence, ui.Dices);
            break;
        case GameType.Replay:
            _gameplayLogic = new ReplayGameplayLogic(PlayRealManager.Instance.Persistence, ui.Dices);
            break;
        default:
            break;
    }

    _gameplayLogic.LogEnabled = PlayRealManager.Instance.LogLogicEnabled;
    //---

    //--- General local and online events
    _gameplayLogic.LocalPlayerTurnEvent += GameplayLogic_LocalPlayerTurnEvent;
    _gameplayLogic.OtherPlayerTurnEvent += GameplayLogic_OtherPlayerTurnEvent;
    _gameplayLogic.RoundEndedEvent += GameplayLogic_RoundEndedEvent;
    _gameplayLogic.GameOutcomeEvent += GameplayLogic_GameOutcomeEvent;
    //---

    //--- Dice game specific events
    _gameplayLogic.DicePickedIndexEvent += GameplayLogic_DicePickedIndexEvent;
    _gameplayLogic.RollDicesAnimationEvent += GameplayLogic_RollDicesAnimationEvent;
    //---

    //---> Online events
    if (PersistenceManager.Instance.Persistence.GameType == GameType.Distant)
    {
        ((DistantGameplayLogic)_gameplayLogic).PlayerPresenceUpdatedEvent += GameplayLogic_PlayerPresenceUpdatedEvent;
        ((DistantGameplayLogic)_gameplayLogic).RefreshGameStatusEvent += GameplayLogic_RefreshGameStatusEvent;
        ((DistantGameplayLogic)_gameplayLogic).GameAbortedEvent += GameplayLogic_GameAbortedEvent;
        ((DistantGameplayLogic)_gameplayLogic).OtherPlayerQuitGameEvent += GameplayLogic_PlayerQuitGameEvent;
        ((DistantGameplayLogic)_gameplayLogic).LocalPlayerQuitGameEvent += GameplayLogic_LocalPlayerQuitGameEvent;
        ((DistantGameplayLogic)_gameplayLogic).PlayerJoinGameEvent += GameplayLogic_PlayerJoinGameEvent;

        _chatLogic = new ChatLogic(NetworkManager.Instance.ServerConnection, PersistenceManager.Instance.Persistence);
        _chatLogic.ClientChatEvent += ChatLogic_ClientChatEvent;

        _chatLogic.Init();
    }
    else
    {
        //---> Hide the Chat button in local mode
        ui.ChatButton.gameObject.SetActive(false);
    }

    //---> Initialize the logic
    _gameplayLogic.Init();
}
According to the GameType parameter (Local, Distant or Replay) stored in the
persistence, whether LocalGameplayLogic, DistantGameplayLogic or ReplayGameplayLogic
is instantiated in the _gameplayLogic member of LobbyGameView.
Also, if GameType == Distant, the ChatLogic is instantiated.
With events, the view will be notified when :
- It’s local player turn :
GameplayLogicBase.LocalPlayerTurnEvent - It’s the turn of another player (distant / AI) :
GameplayLogicBase.OtherPlayerTurnEvent - This is the end of a round :
GameplayLogicBase.RoundEndedEvent - This is the end of the game :
GameplayLogicBase.GameOutcomeEvent - The dice selection animation must be played :
GameplayLogicBase.DicePickedIndexEvent - The dice rotation animation must be played :
GameplayLogicBase.RollDicesAnimationEvent
Exclusively in online mode :
- The presence of a player has changed :
DistantGameplayLogic.PlayerPresenceUpdatedEvent - The status of the game has changed :
DistantGameplayLogic.RefreshGameStatusEvent - The game is aborted :
DistantGameplayLogic.GameAbortedEvent - A distant player has left the game
DistantGameplayLogic.OtherPlayerQuitGameEvent - The local player left the game :
DistantGameplayLogic.LocalPlayerQuitGameEvent - A distant player joins the game :
DistantGameplayLogic.PlayerJoinGameEvent - A chat message is received :
ChatLogic.ClientChatEvent
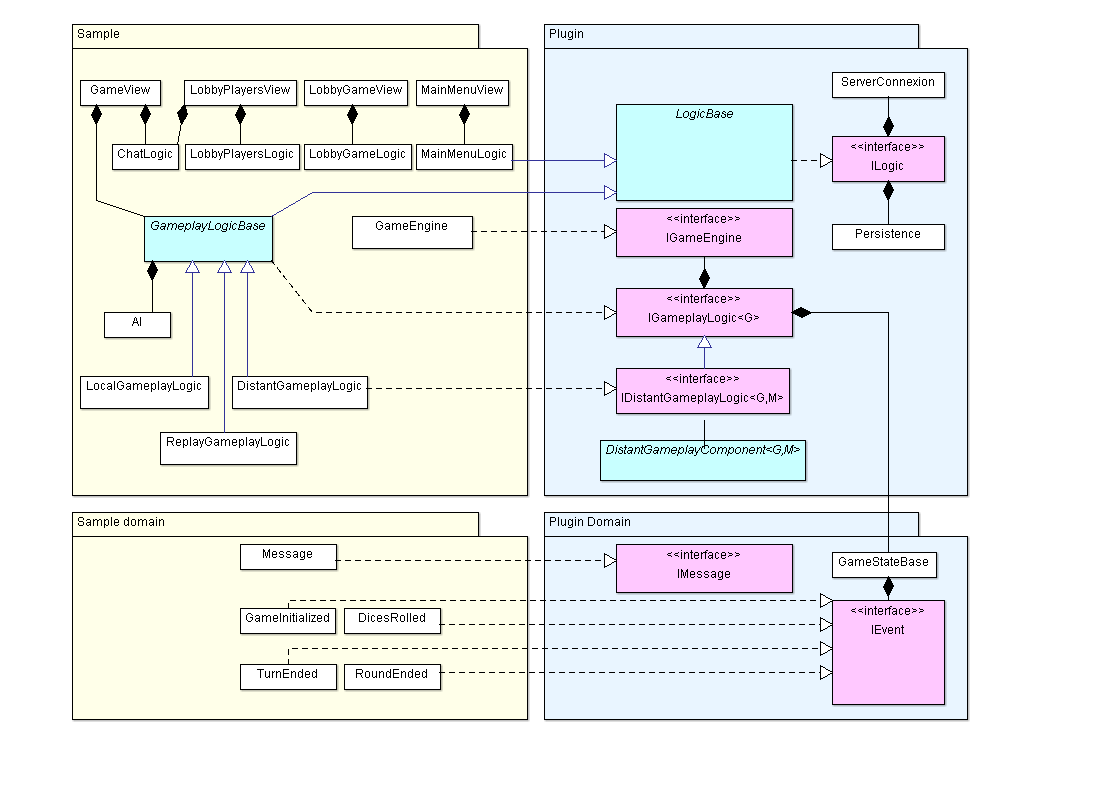
Architecture
The SDK contains a set of class and interface that allow building a game architecture supporting the event sourcing, local game with AI and online game.
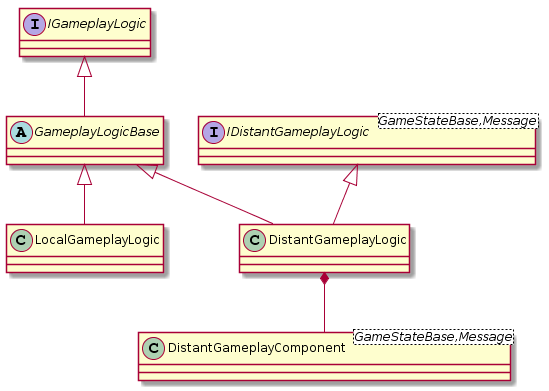
The interfaces IGameplayLogic, IDistantGameplayLogic, IMessage and
the classes GameStateBase and DistantGameplayComponent are part of the
SDK. That means they are designed to be used as such to build game architecture.
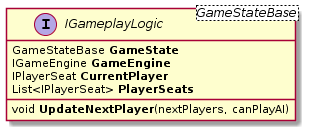
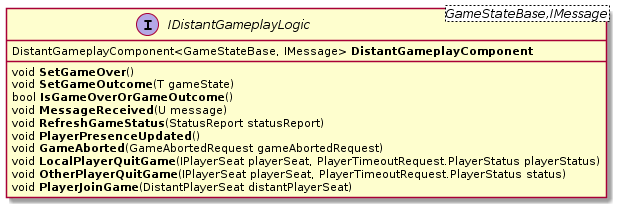
- With
IGameplayLogicyou can build the common base for the single player and online gameplay logic. IDistantGameplayLogiccomplement the online gameplay class.DistantGameplayComponentwill manage a large part of technical features of online and drive the class deriving fromIDistantGameplayLogicBaseaccordingly.GameStateBasestores all the actions of the players. It is the object transiting between players and which determines the state of the game. In solo, it can be saved in a file to save the game.IMessageis the model for multicast messages
Communications with Scalable Server
Communication with the Scalable Server is done through object serialization sent over TCP/IP with a socket. The format used is Protobuf.
To send events (IEvent) and messages (IMessage) to Scalable Server,
we must serialize it. It’s the role of AsmodeeNetSerializer.
AsmodeeNetSerializer is a class that is embedded in the generated AsmodeeNetSerializer.dll
Serialization is automatically done in the ServerConnection component when
CommitAction, MultiCastDataRequest are called and when new data
are coming from the Scalable Server
Event sourcing
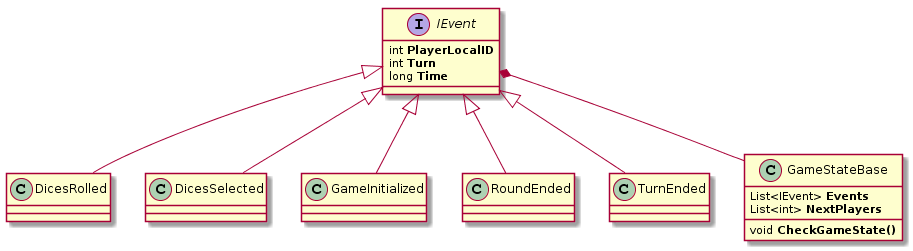
As recommended by the documentation, the Asmodee.net Unity SDK is built on the concept of event sourcing. This will make the task for cheaters much more difficult and we can make replay of old games easily.
The principle of event sourcing is not to store results in
memory but only the actions leading to results. Thereby each time a result
is required (to display the values of the dice for
example) the entire stack is replayed by the GameEngine.
The sample store the stack of players actions in the GameState object.
It is from this stack that value of the dice,
score and the winners of each round are calculated. Each player action
is stored in the GameState then it is sent to the Scalable server.
It is possible to leave and return to the middle of a turn.
Example
In the case of the sample:
- The first event stored in the
GameStateisGameInitalized. The seed of the random number generator (RNG) and the number of players are saved into it. TheGameStateis sent to the Scalable Server. - The first player rolls the 3 dices, the event
DicesRolledis stored. Index and not values of rolled dices (0, 1 and 2) are saved in it. TheGameStateis sent to the Scalable Server. - To view the results of the dice,
GameEngineplays the stack of events from the beginning, by initializing the RNG then draw 3 times a random number between 1 and 6. - The first player re-roll the dices 0 and 2.
DicesRolledis stored with index 0 and 2. TheGameStateis sent to the Scalable Server. - To view the result of the dice, as in #3, the entire event stack is played, there is 5 draw of random numbers.
- The first player finishes his turn, the
TurnEndedevents and is stored in theGameState GameStateis sent to Scalable Server which will send it to next player.- The last player of the round will add
RoundEndedevent to the stack, resulting in the end of the round and score calculation - The players score is calculated by computing the stack of events from the beginning to ensure the reproducibility of the RNG
Creating your own events and messages
If you want to create your own events, you need to create a YourGameDTO c# project. This project is external to your unity project.
When you setup the Asmodee.net Serializer , you’ve unzipped the ScalableServerDTO solution.
- Open the ScalableServerDTO solution into Visual Studio or Monodevelop
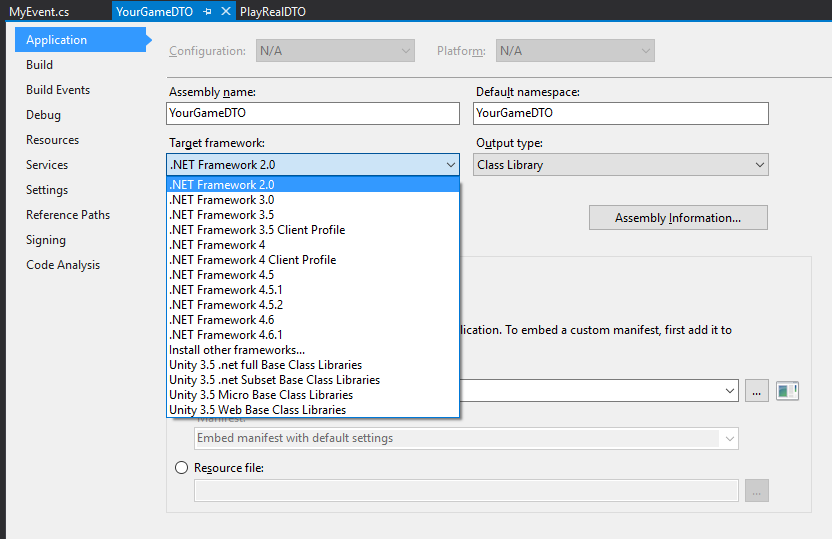
- Create a new Class Library Project
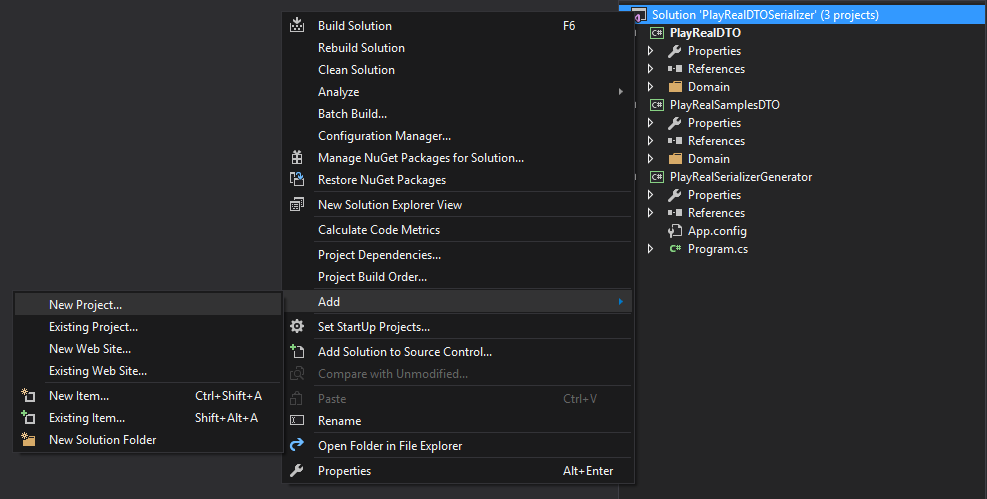
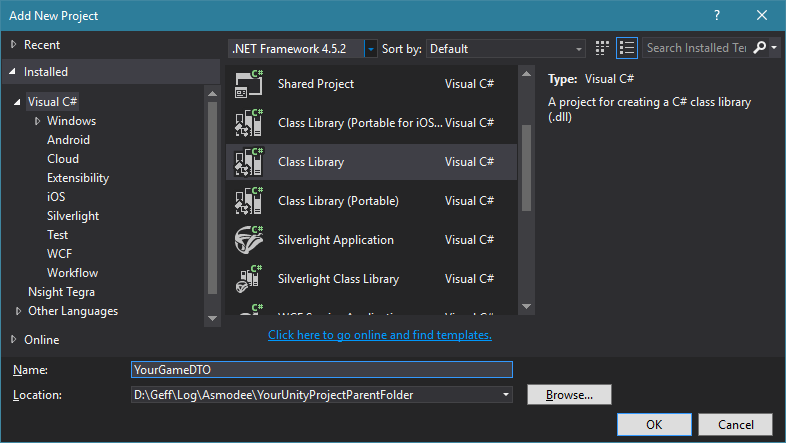
- Set The target Framework of your Project to .NET Framework 2.0
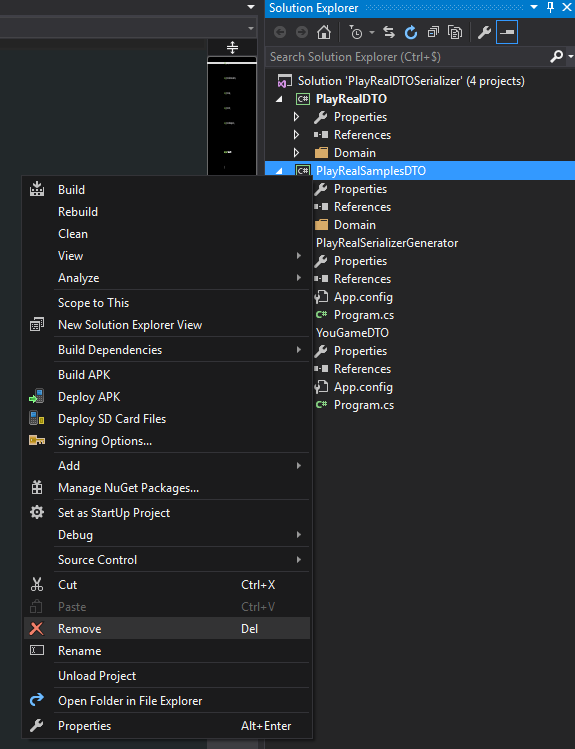
- Remove the PlayRealSamplesDTO project from the solution
- Add protobuf-net.dll reference to your new DTO project, by browsing it near the solution
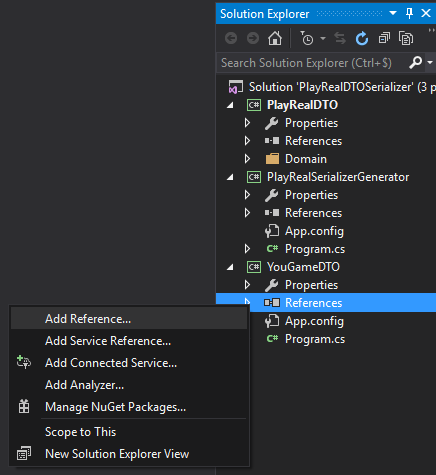
- Add PlayRealDTO reference to your new DTO project, by selecting it in the projects tab
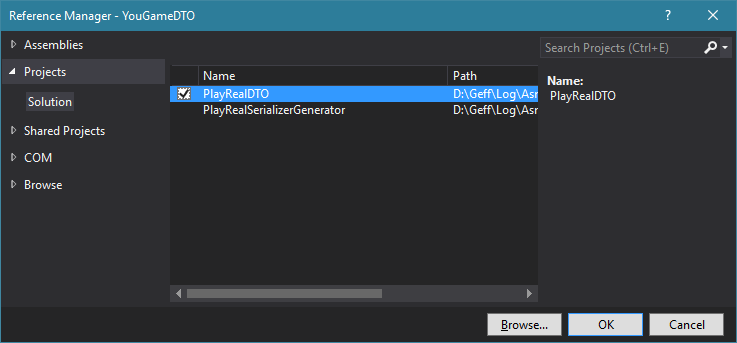
- Remove the Class1.cs file in your project
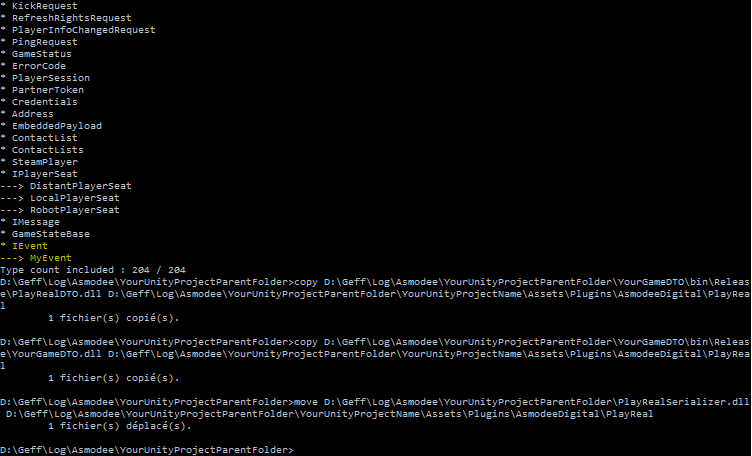
- Create your own Event class inherited from IEvent
using AsmodeeDigital.PlayReal.Plugin.Domain.GameState;
using ProtoBuf;
using System;

namespace YourGameDTO
{
    [ProtoContract, Serializable]
    public class MyEvent : IEvent
    {
        /// <summary>
        /// Player local ID
        /// </summary>
        [ProtoMember(1)]
        public int PlayerLocalID { get; set; }

        /// <summary>
        /// UTC time
        /// </summary>
        [ProtoMember(2)]
        public long Time { get; set; }

        /// <summary>
        /// Value for documentation
        /// </summary>
        [ProtoMember(3)]
        public int MyValue { get; set; }

        public MyEvent()
        {
        }
    }
}
- Compile the solution in Release mode
9. Once the compilation done, change the YOUR_PROJECT_DTO and UNITY_PROJECT_FOLDER variable in the build_AsmodeeNetSerializer.cmd or build_AsmodeeNetSerializer.sh and launch it in order to create the AsmodeeNetSerializer.dll.
10. A new AsmodeeNetSerializer is compiled.
PlayRealDTO.dll, YourGameDTO.dll and AsmodeeNetSerializer.dll are copied into the
/Assets/Plugins folder of your Unity project
Sending an action
Whether in solo or online, the player’s actions are managed in GameplayLogicBase.
DistantGameplayLogic overloads methods to send the GameState to the Scalable Server
Example - Roll of the dice:
In the abstract GameplayLogicBase:
/// <summary>
/// Create *dices rolled* event in game state. Store the list of selected dices to roll
/// </summary>
/// <param name="dicesIndices">List of selected dices to roll, by default all dices</param>
public virtual void CreateEventDicesRolled(List<int> dicesIndices = null)
{
    Log("Event : Dices rolled");

    State = States.DiceRolled;

    if (dicesIndices == null)
        dicesIndices = new List<int> { 0, 1, 2 };

    GameState.Events.Add(
        new DicesRolled(
            CurrentPlayer.LocalId,
            Turn, dicesIndices));
}
In DistantGameplayLogic:
/// <summary>
/// Create *dices rolled* event in game state. Store the list of selected dices to roll.
/// Then commits the game state to the server. The current player can continue to play
/// </summary>
/// <param name="dicesIndices">List of selected dices to roll</param>
public override void CreateEventDicesRolled(List<int> dicesIndices = null)
{
    //---> Call the GameplayLogicBase method
    base.CreateEventDicesRolled(dicesIndices);

    //---> Commit the action to the **Scalable Server**
    DistantGameplayComponent.CommitAction(false);

    //---> Send a multicast message so that other players see the animation of the dice
    SendRolledDicesMessage(dicesIndices);
}
DistantGameplayComponent.CommitAction(nextPlayerTurn) skips to the next
player if the parameter nextPlayerTurn == True
Each sent action, the Scalable Server return ActionCommitedRequest and ActionRequiredRequest to the next player, which in our example is the current player (self).
ServerConnection
Send request
ServerConnection.CommitAction(GameID, localPlayerId, nextPlayers, gameState)
Reception event
ServerConnection.ActionCommitedEvent += ServerConnection_ActionCommitedEvent

private void ServerConnection_ActionCommitedEvent(ActionCommitedRequest actionCommitedRequest)
{
    [..]
}
ServerConnection.ActionRequiredEvent += ServerConnection_ActionRequiredEvent

private void ServerConnection_ActionRequiredEvent(ActionRequiredRequest actionRequiredRequest)
{
    [..]
}
Next player

the game moves to the next player when the current player call
DistantGameplayComponent.CommitAction(nextPlayerTurn) with nextPlayerTurn == True
The Scalable Server send the ActionRequiredRequest to the the next player,
which will raise ServerConnection.ActionRequiredEvent
DistantGameplayComponent subscribes to ServerConnection.ActionRequiredEvent.
It get the GameState sent by the Scalable Server and determines who is the
next player by calling the DistantGameplayLogic.UpdateNextPlayer(nextPlayersIds)
Local player
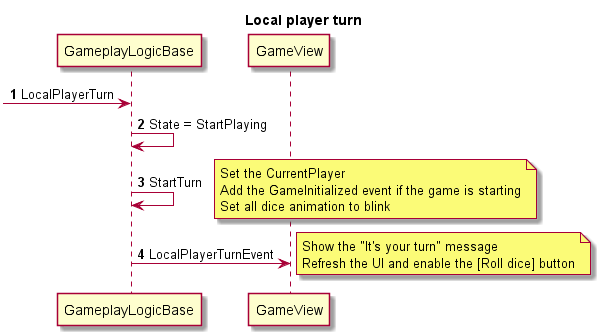
In Solo or online mode, the management of the local player remains the same.
It is managed by GameplayLogicBase.LocalPlayerTurn
Distant player
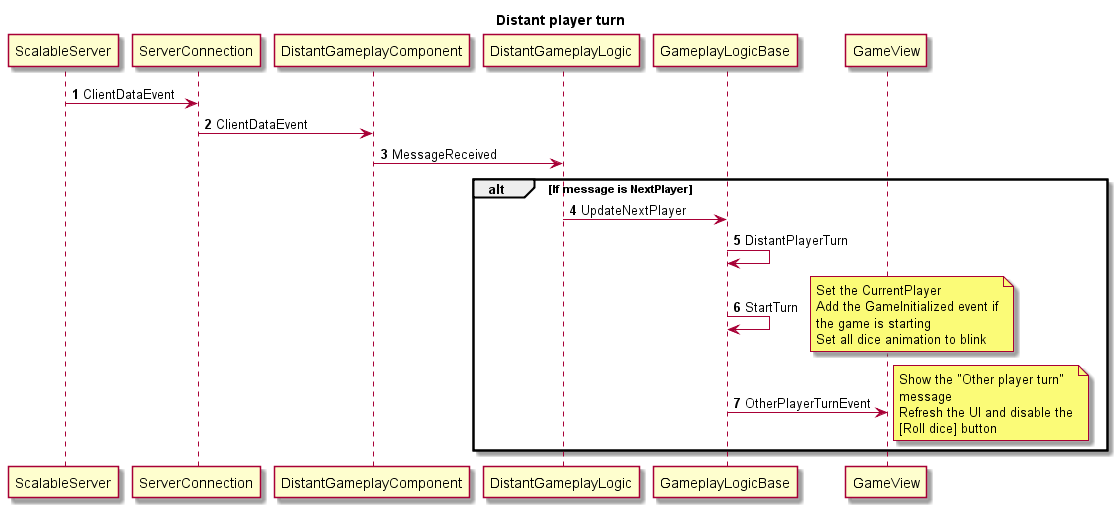
The turn of a distant player is reported to other players by
multicast message when the current player commits his EndTurn
This message is then received by all the other players, thereby refresh the UI
Artificial intelligence
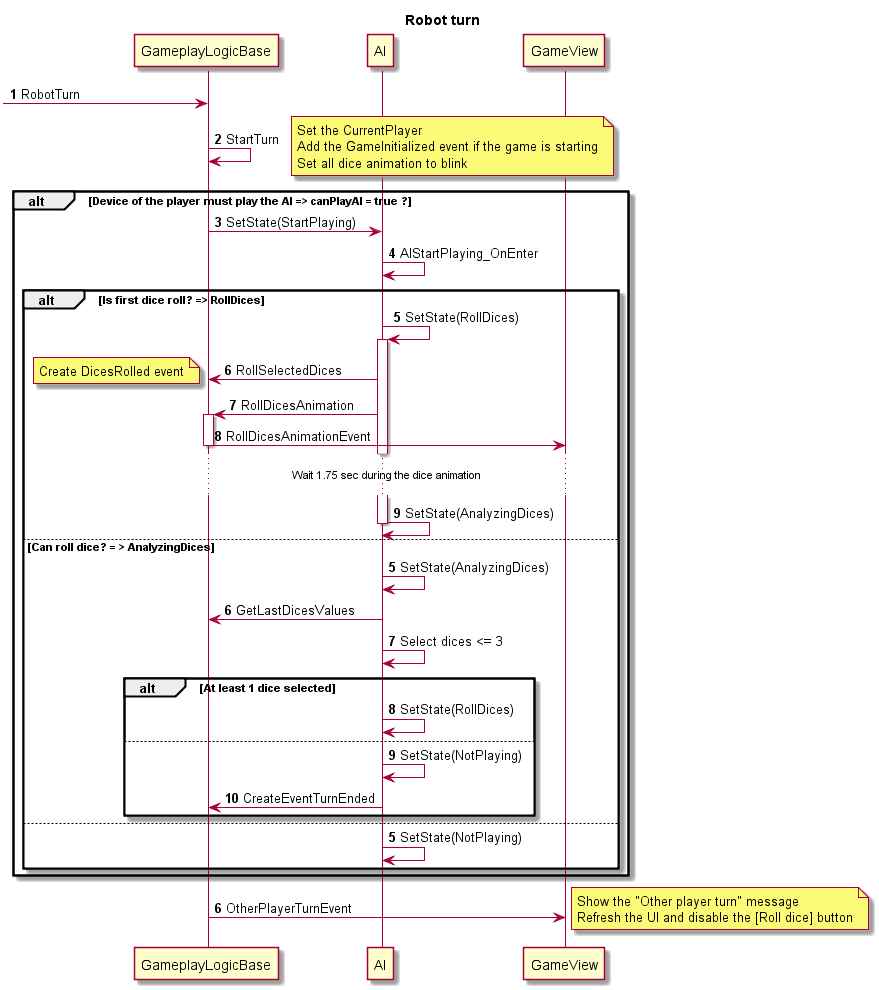
The device of a player can play the AI in the single player game or when a distant player was replaced by AI.
Solo game
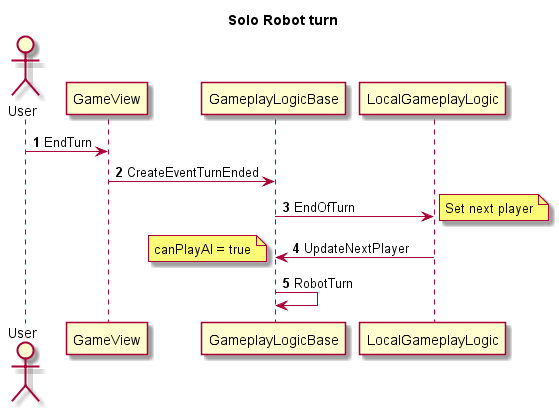
In solo, the AI can play after the turn of a player.
LocalGameplayLogic.EndOfTurn called GameLogicBase.UpdateNextPlayer with
parameter canPlayAI == True
Online game
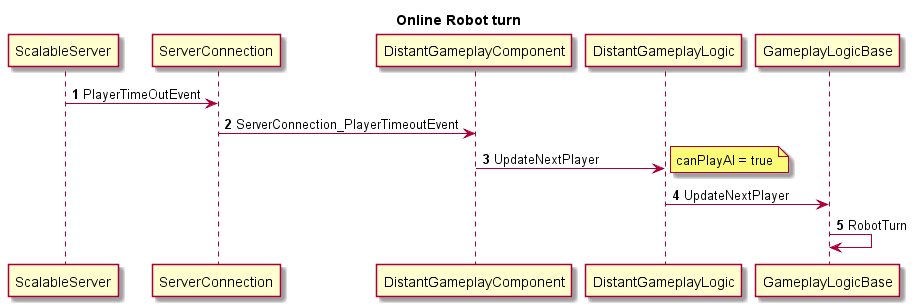
Scalable Server determines who play the AI by sending a
PlayerTimeoutRequest. DistantGameplayComponent subscribed to
ServerConnection.PlayerTimeoutEvent, which allows it to call
GameplayLogicBase.UpdateNextPlayer with the parameter
canPlayAI == True when the device of a connected player must play the AI.
GameEngine
GameEngine is the class (or set of classes) managing the
rules and calculation of results from the events of GameState.
It is this object that will be called to play the entire stack of events.
The IGameEngine interface offers a free design. In the sample
it is considered as a database engine which must return a result from a given
request and a set of data.
For each request, ComputeEvents is called
public T ComputeEvents<T>(GameStateBase gameState, int playerLocalId, Evaluation evaluation)
gameState parameter is the set of data from wich we want a result
for the given player id and the evaluation.
GameEngine will then compute the entire game in memory and stored temporarily
the results. Then it will choose the result in the variable and
return it. Thus, the results are a very short time in memory.
Example
/// <summary>
/// Get Score of defined player, by default the last player
/// </summary>
/// <param name="playerLocalId">Player local ID. By default the last player</param>
/// <param name="gameState">Game state whose the score is computed. By default the game state of the current game is used</param>
/// <returns></returns>
public int GetScore(int playerLocalId = -1, GameStateBase gameState = null)
{
    if (gameState == null)
        gameState = GameState;

    if (playerLocalId == -1)
        playerLocalId = CurrentPlayer.LocalId;

    return ((GameEngine)GameEngine).ComputeEvents<int>(gameState, playerLocalId, Evaluation.GetScore);
}
Messages
To notify the other players of the current player’s actions in real time, a multicast message system was put in place.
Sending and interpretation of messages are done in
DistantGameplayLogic, their reception in DistantGameplayComponent
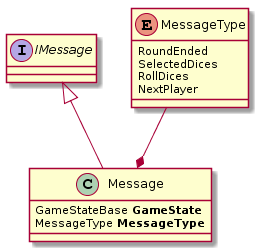
A message is a class which implement the interface IMessage.
The message can then adopt any form.
In the sample, it was decided to integrate the GameState and enumeration
MessageType
DistantGameplayLogic is generic and takes two types in
its construction DistantGameplayComponent<GameStateBase, iMessage>.
Sending a message
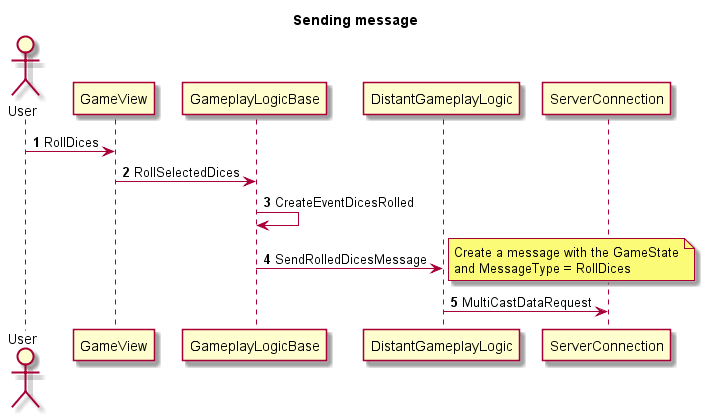
DistantGameplayLogic call ServerConnection.MultiCastDataRequest to
send the desired message. It is possible to select the recipients, specifying the
Local players Ids
Receiving a message

DistantGameplayLogicComponent receives the message through its
ServerConnnection.ClientDataEvent subscription. The message is deserialized in the defined type set at the instantiation of DistantGameplayLogicComponent.
It is then transmitted to DistantGameplayLogic which interprets it thanks to
DistantGameplayLogic.MessageReceived(message)
Exiting the game
In online mode, a player can leave the game by two different ways depending on the game mode :
- Single session (synchronous): Forfeit
- Multi Session (Asynchronous): Forfeit or Leave
Forfeit
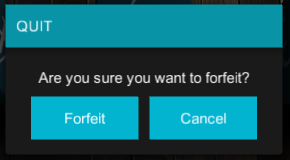
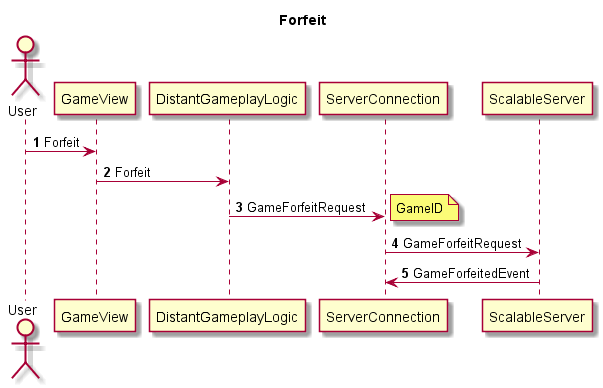
When a player forfeit, he left the game for good, without the possibility of returning.
ServerConnection.GameForfeitRequest is called specifying the GameID
Leave a game temporarily
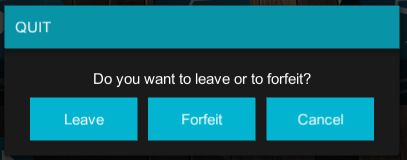
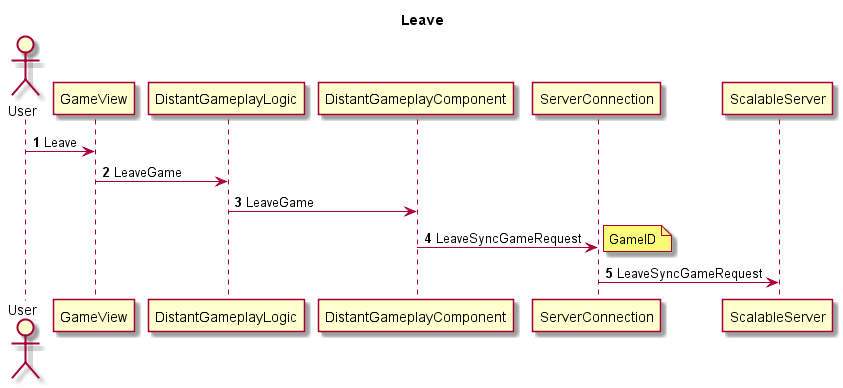
It is possible in a multi-session game to leave a game temporarily. The player can come back later as long as his player clock is not completely elapsed.
Chat in game
Sending a chat from a game
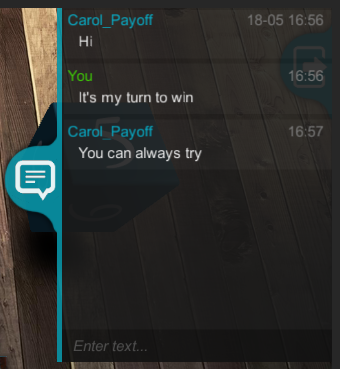
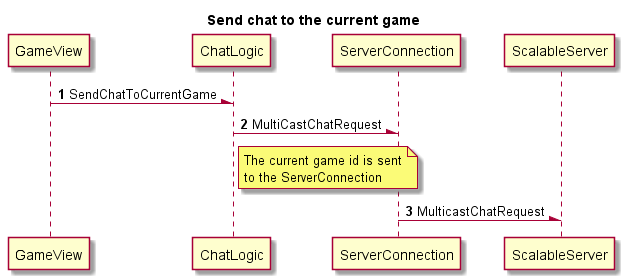
The chat in game uses the same ChatLogic class that in the lobby.
To send a chat message to the current game you must call ChatLogic.SendChatToCurrentGame
ServerConnection.MultiCastChatRequest is called specifying the GameID
Savegame
In solo, it is possible to save and load a game.
This feature is compatible with Android, iOS, MacOSX, Linux, Windows and also directly from the Unity editor.
For the standalone version (MacOSX, Linux and Windows) the savegame is located in the user directory. This allows Steam Cloud synchronization
File path by platform:
- Android : Persistent Data Path (/data/data/[com.mycompanyname]/[myapp]/files)
- iOS : Persistent Data Path (/var/mobile/Applications/xxxxx-xx-x-xx-xxxx/Documents/)
- Windows : Local application Data (C:\Users\[username]\appdata\local\[filePath])
- MacOSX : Local application Data (/Applications/Unity/MonoDevelop.app/Contents/MacOS/../Frameworks/Mono.framework/Versions/Current/share/[filePath])
- Linux : Local application Data (~/.[filePath])
Saving a game
To save the game, you must save the GameState.
SaveGameState is generic, the first parameter accepts any subtype
of GameStateBase. The second parameter to provide is the short file path.
This path must not contain disk name (not an asbolute path).
The SDK takes care to save the file to the appropriate location
depending on the platform.
SaveManager.SaveGameState(GameState, @"AsmodeeDigital\PlayReal\save.sav");
Loading a game
Loading the savegame file is done by specifying the short file path and the generic output type.
GameState = SaveManager.LoadGameState<GameStateBase(@"AsmodeeDigital\PlayReal\save.sav");